Affichage des articles dont le libellé est Change. Afficher tous les articles

Shape Change Page Numbered Navigation Widget For Blogger

Changing Shape On Mouse Over Page Numbered Navigation Widget For Blogger 

Hi Bloggiyan! If you are searching Stop your search now, You Found Unmatched Page Navigation widget . Its style totally different with other of our previous Page Navigation post, Its changed shape on mouse over and user will like to click it . we are also planning to implement this widget on our blog. what can we do more now you can add this widget in just 1 simple step.

Above is animated picture preview, We also prefer to save user time that's why we make animated preview instead of clicking demo link . Lets Start adding this widet.

Easy Step to add Shape change Page Number Navigation.


1. Go to blogger dashboard.
2. Click on layout.
3. Choose add a gadget.
4. Choose HTML/JAVASCRIPT.
html javascript widget blogger
5. Copy the below code and paste it.


5. Save Done!

Post Your Comments And Ideas 

Pure Css Text Box With Mouse Over & Copy Text Color Change Effect

Pure Css Text Box With Mouse Over & Copy Text Color Change Effect


As you see below a pure Css text box with mouse over effect That change color while moving mouse around text box also its change color while you copy text inside this text box .This text box is having hover effect which make this software good looking the main advantage of this text box is that it change it color from black to Cornflower Blue when you will mouse over it.And if you click on text box it changes it color to shrek green.The border of the text box having  stitched effect and also having box shadow behind box.

Find out how to make Pure Css Text box-

Its all the about Css & Html.If you know basic of Css & Html the you can make this text box.You don't need to make code as I will provide you.You only need to copy and paste.

How Add This Code In CSS 


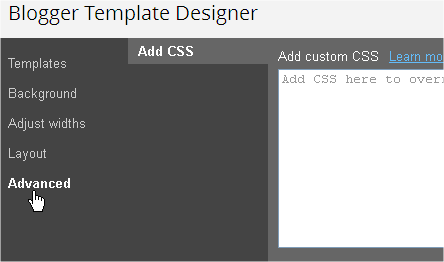
1. Go To Blogger >> Template >> Customise 


2. After Opening  Template Customise Go To Advanced >> Add Css.
3. And there paste the code.


 Paste Following Code In Add Custom CSS Field


.postmsgg23
{
color: white;
background-color: black;
width: 500px;
margin: 5px 60px;
padding: 20px 20px 20px 20px;
border: 2px dotted lightgrey;
border-radius: 10px;
box-shadow: -1px -1px 12px 2px gainsboro;
transition: background-color .777s;
-webkit-transition: background-color .777s;
-moz-transition: background-color .777s;
-o-transition: background-color .777s;
-ms-transition: background-color .777s;
}

.postmsgg23:hover
{
background-color: CornflowerBlue ;

}
.postmsgg23:active
{
background-color: darkgreen ;
}


Paste The Html Section where you want to put Css text box in your Website and Paste the Css section in your website Css.

HTML 


Yout Text Here
 

IF you are facing any problem to add this Pure Css Text Box in Blogger, Feel free to comments here.

Change Boring Default Bullet Point Style In Blogger - Replace Bullet With Image

Replace Default Bullet List Point Into Image On Blogger

 
 How To Use Images For List Bullet Points On Your Blog

Today when I was thinking do to something awesome with Css then suddenly i saw bullets default blogger bullets are not looking so good so I decided to add images instead of bullets.

If you want to change blogger default bullets then find beautiful image but remember size of image should be very less or you need to add padding in Css code.

 How To Use Images For List Bullet Points On Your Blog

  • Go To Blogger Dashboad
  • Click On Template Tab.
  • Now Click on Customize button.
  • Now Select Advance Tab.
  • Now scroll down and you will see Add Css Option Click On It And Paste blow code There

 Watch Video Tutorial To Change Blogger Bullet List Point Style


.post ul li {
list-style-image:url('Bullets-Image-URL');
}

Replace Bullets-Image-URL With Your Bullets Image URL and save it.


Some Ready Made Bullets Code Just Paste below code in your blog Css

.post ul li {
list-style-image:url('https://blogger.googleusercontent.com/img/b/R29vZ2xl/AVvXsEhs4QWYjDWaOAE_7sNyLlxY8MU3R4U-RrCW1gDXySmkQRnw7hUmMKVBt-OCLPoznS2K8Rn66mtCCioZsR4COXNrgw5A2JLedme-BaBYpOn_M3MPTb2n6M9m3YNmCPSTUMU5IjXNWfrno-MO/s1600/11-dot-green.png');
}

.post ul li {
list-style-image:url('https://blogger.googleusercontent.com/img/b/R29vZ2xl/AVvXsEgcECoO5I0LyzLFKjzndOoB1stGQw890u-5WbRXNUnflaDSU-Kqp238Uo4KwIU4Siek6Pf6y_LjI0hSNKjCYY1qxceM2gljovVMH3NkNzjgybCF6l_MAgstULYKqnuD4S1c4oBPrpPIl0-h/s1600/bullet_page_white.png');
}


.post ul li {
list-style-image:url('https://blogger.googleusercontent.com/img/b/R29vZ2xl/AVvXsEikrL9leBIBVRn4F03Jemy3IvZfbF7CVzjTjE1bTGPdskNthBzhs0_YEzofWZmNqDi2tM7ErN9q5un0LozZUye4m427ZULchAAN_i71V_5e3-b7MIYArcPwOsS08MjXQ0mRF-timHLKcZYf/s1600/bullet_blue_arrow.png');
}

.post ul li {
list-style-image:url('https://blogger.googleusercontent.com/img/b/R29vZ2xl/AVvXsEiER0tW4Se3Rw7CbID0VyBILxSkykcA28PQvliKH3-B3hI0klUWP57jrpdM0vdlaH_OiIHv1XQyewD_Y-_e8B_yZslLTtFw9uP8hA0-2YW8b9cSz8mkwv9PbZw5ws6Ke7cEFh42WW2dkK6P/s1600/bullet_error.png');
}


.post ul li {
list-style-image:url('https://blogger.googleusercontent.com/img/b/R29vZ2xl/AVvXsEgERulSbgjYHLxhAdJDFkjq3_7CXyCFaA_0xhGZmE0YKF4SPXIg6P51TC95sbonEROTacQM3XrN_V0dhHrzzShFNSiITcnMfE1oz1wWStXgfuz_uj8oHie-5jq5Y_4OaebqWE9gYd2WdBUY/s1600/bullet_home.png');
}


.post ul li {
list-style-image:url('https://blogger.googleusercontent.com/img/b/R29vZ2xl/AVvXsEgVHbIua1aIjMOxtNIWUEaomPXmaDI-nFlQihmgeRzNbEEOqlNVONocqGlz53lS9XPu0cO8odrFiYee1ASzgdiz6kMDlwOpRFXVLnVU2-GJV7y8IKq4zh2jaDZ8NJmvDPiljIfGZ0uMyIOQ/s1600/bullet_tick.png');
}

.post ul li {
list-style-image:url('https://blogger.googleusercontent.com/img/b/R29vZ2xl/AVvXsEhTopJb8HvJPX3bFLb2feCI7WYfUBIoafQX51RJSmw3Zse0prahljy1HuOjlHdjUCv9jgYqPZ7FoLLxCVeSqsQc1Gm7iEsfswVg8LcFDqd15ETkOFGBlZlu_28G9lN4ojKqzEJTEmkxKRiC/s1600/chrome_icon.gif');
}


Comment And Share If You Like This Post Please!!!!

How to Change the Title Tags in Blogger for More Search Engine Traffic

How to Change the Title Tags in Blogger for More Search Engine Traffic


By default Blogger displays the blog title first, followed by the name of the post. As you might notice this is not good when it comes to SEO. It's important for the name of the post to come before the name of your blog, especially when it comes to google search results. Learn how to make your post title show up first so that you can reel in more traffic from the search engines.

Why Change the Titles?

It's quite important to have the Post Title + Blog Title arranged accordingly because this is how you would want your blog to be displayed on google's search results. This way more people will click on your link when searching google because the post title is more relevant than your post name.
Example Google Search Results:
You are most likely to click on the bottom image when searching google for the keywords "image reflection generator". The reason being is that your mind reads text from left to right. So it makes sense to have the more important title on the left.

How to Change the Titles:

  • Go to Layout>edit HTML in your Blogger dashboard.
  • Search for this tag: <data:blog.pageTitle/>
  • Replace this tag with the following code:
<data:blog.title/> <data:blog.pageName/> | <data:blog.title/>
Save your template and you should see the results in your web browser as depicted in the images below.
It may take a few days for the changes to show up on the google search results. I guarantee you that you will start receiving more traffic from google once you are re-indexed!

X-Setup Pro Free by XQDC Ltd Change Hidden Settings In Windows

X-Setup Pro Free by XQDC Ltd Change Hidden Settings In Windows


X-Setup Pro is a so-called "hacker" or "tweaker" program. It allows you to change 1,900 settings that are normally hidden deeply in some configuration-files like the registry fast and easily. It's runs on any Windows version, is clutter-free, easy to use, extensible, powerful, covers any aspect of your computer and has more configuration options than any other tweaker.
Dear Customers,
Because of the insolvency of WUG all operations regarding X-Setup Pro have been shut down.
We thank all customers, partner and friends for their support during this time. We hope you had as much fun using X-Setup Pro as we had making it.


Direct Download Link

X-Setup Pro 9.2.100


Official Serial key provided to s2free.blogspot by XQDC Ltd 
For anyone to use: XSA092-11TA9R-8K12YT

Change Bloggers Default Anonymous Comment Avatar

Change Bloggers Default Anonymous Comment Avatar

Change Bloggers Default Anonymous Comment Avatar
Bloggers Default Anonymous Avatar 
If you moderate your blogger comments then you may or may not allow anonymous users to post on your site.  If you do allow anonymous users to comment you've more than likely noticed the default avatar.
Blogger default anonymous avatar
If you want to change the Bloggers default anonymous comment avatar to suit your template or just fancy a change, then this helpful tutorial will show you how to.


Blogger offer three default comment avatars, one for anonymous users, one for Blogger accounts without an avatar or even until recently Google+ profiles.

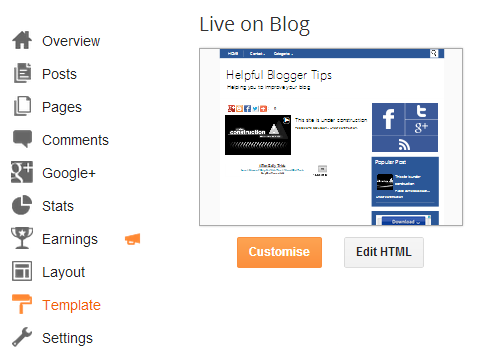
Go to your Blogger dashboard > Template > Edit HTML

Template edit HTML custom avatar
Blogger Edit HTML
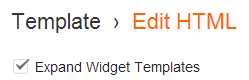
 Make sure you tick, Expand Widget Templates.
Blogger widget edit HTML custom avatar
Blogger widget
Search for the code below.  Helpful tip; Ctrl F to search the HTML template faster.
Now add this code above it.


Save the template.

How to add your own avatar image.

Anonymous user default avatar; change the image URL in blue.
Blogger user default avatar; change the image URL in orange.

Below are some avatar examples that you can use.  Please keep in mind your Blogger theme as you may have to resize.

https://blogger.googleusercontent.com/img/b/R29vZ2xl/AVvXsEhjVKv74gWBWzyKwJhYeiDlrsqYYQZWl6Qm4AP9rcuz3wEaq27jLx8bNKiI5kdi6ZYzurhz4zhOsyW9zbfCEUXdIacFv1JqfTBCU-weCnEGCMsTXzCeNZkVV3ct7wBBxIdohc3q-d9fKKU/s1600/anonymous-avatar2.jpg
Bloggers Anonymous Avatar man standing
https://blogger.googleusercontent.com/img/b/R29vZ2xl/AVvXsEgnEAjgLC-drr9oenGFsi0nbGkjOxn5fAnd0qrtcSdupCI_Sm2HdmTqP1XpM-yf8VVMMk7t9lhIhdZxTbLYWWe1bL9F50cipB9lIINCbzcAOnxh8sAdPkoBFIk56clJ65tiy9kET_ra4rA/s1600/anonymous_avatar.png
Bloggers Anonymous Avatar man head
https://blogger.googleusercontent.com/img/b/R29vZ2xl/AVvXsEjB2Itm1DQCK1BaKAtdXZUb1NSk-dI8NYCHS7F7n7AGuC5c9gaRQgTSvU3cgw19Pm2bgSa8Ody8G7BWiZbUN_7OgHD_K6nXf7tgQ6uaGzLEMoPvQ_2jOmQe3q7Fzw0HpX5YP5ubr0PPyNM/s1600/avatar-constituent-default+(1).gif

Bloggers Anonymous Avatar man green head
https://blogger.googleusercontent.com/img/b/R29vZ2xl/AVvXsEiMA_epOwJHb5oQR4qLdRoCgltPb-rib_5JY5jVH_kl4ll3vzLvFayHR7e1Rgg9q9Me2oBxU6UzpXtnIxgwqVLcw5R_8o9uwH7v8qmgSkcMA9kHo9D0WpEK_5ln1p_cnn_X8Ajqj_TeK08/s1600/avatar-constituent-default+(2).gif
Bloggers Anonymous Avatar man pink head
https://blogger.googleusercontent.com/img/b/R29vZ2xl/AVvXsEh_Id6KYoCiXzRnCvEjlrSC6-FUEuakL_Y30bO6b23L2ezzWgZ1za5Mmxe5gGQTzcUutwEslb6oOB83rZawDduMGGAEBwqgOnEB-s6irydAJxhDcznSI645bM56cfsOWzSjuavsElicrTo/s1600/avatar-constituent-default.gif
Bloggers Anonymous Avatar man dark head

Job Done...