![[Tutorial] Install AOKP ROM (Android 4.4.2) On Nexus 7 (2013) Wi-Fi version tablet](https://lh3.googleusercontent.com/blogger_img_proxy/AEn0k_u16-BZf4Z0FA2II0gB0UYvpwz_kJ5x5XaXRdAZwMxwPaG2GFQS3thx7LpbH0eFTePPIsP1ZKUT1pkdFplAtUzgy2QMcpXVKDgD-7ekUYtgz1NMGJcXutwW1JuNy0zRN6bdT6QhgdL95HlPSBt0qALhKTMhH2ntGSs2nwd4xu_LYbDaeEanpE_yNlg=s0-d "[Tutorial] Install AOKP ROM (Android 4.4.2) On Nexus 7 (2013) Wi-Fi version tablet")
Affichage des articles dont le libellé est Install. Afficher tous les articles
Affichage des articles dont le libellé est Install. Afficher tous les articles

Install Any App to Your Kindle Fire HD! Easy as 1-2-3
Install Kindle
Install Any App to Your Kindle Fire HD! Easy as 1-2-3, no root or file manager required.
Amazon restricts the apps you can install on your Kindle Fire HD. But what if you want to get apps from outside the Amazon Appstore?Here’s an easy 3-step solution, with NO root and NO file manager required. Sideload from thousands of free apps directly to your Kindle Fire HD!
USB CONNECTION (3 steps)
Step 1:
- On your Kindle Fire HD, go to: More > Security > Enable ADB (Turn this ON)
Step 2:
- On your computer, download and install SnapPea for Windows: SnapPea is the easiest way to manage your Kindle Fire HD from the desktop!
Step 3:
- Use a Micro-USB cable to connect your Kindle Fire HD to your computer. Open SnapPea for Windows and it’ll automatically connect to your phone and install the SnapPea app on your Kindle (so that you can start side-loading apps). You’re all set!
WIFI ALTERNATIVE (4 steps):
Step 1:
- On your Kindle Fire HD, go to: More > Device > Allow Installation of Applications (Turn this ON)
Step 2:
- On your Kindle Fire HD, go to: Download Page SnapPea for Android. Open notifications and click to install the SnapPea download file.
Step 3:
- On your computer, download and install SnapPea for Windows:www.snappea.com SnapPea is the easiest way to manage your Kindle Fire HD from the desktop!
Step 4:
- On your computer, open SnapPea for Windows and select “Connect phone”. Select your Amazon Kindle Fire HD. Enter the passcode shown on your Kindle Fire HD in the SnapPea app. You’re all set!
START INSTALLING APPS!

A) Go to: Download > 1Mobile and download from thousands of free apps from 1Mobile. There are no geographic restrictions and all apps are 100% free.
B) Go to: My Phone > Apps and “+Install Apps” to load APK files directly onto your Kindle Fire HD. Sweeeeet.
Sending Group Texts with SnapPea
One day, my friend Zack decided he wanted to have a party and invite all of his friends with a single text message. Difficulty: he wanted to do so without touching his mobile device from the comfort of his desktop computer.Fortunately, Zack is an avid SnapPea user and he knew that he could simply send group texts all from his SnapPea client.
First, he opened his SnapPea client to its “Text Messages” tab.

Then he clicked “Send text.”

He selected all of his friends, being careful not to choose Adam (nobody likes Adam).

Next, he wrote them a note, using SnapPea’s $NAME function to address each contact by name in the text message. Notice he also specifies that nobody should bring Adam.

Finally, he clicked “Send.” The rest, as they say, is history. The party was epic, btw (don’t tell Adam).
Side Loading Apps Made Easy with SnapPea
Suppose you want to use an app that’s not yet available in the Google Play store. What do you do? With SnapPea, you can easily install apps to your Android phone by first downloading them to your PC.First, download the app’s .apk file to your desktop. Below, I’ve downloaded the Cubie Messenger .apk to my desktop (OK, it’s available in the Google Play store, too, but work with me here).

Next, open SnapPea and select your Apps tab.

Click Install apps —> select file, and find the .apk file that you’ve downloaded.

Hit Install.

The newly installed app won’t show in the your installed apps list at first… but not to fear! After you hit “Refresh,” you’ll be in business.

Assuming you’ve got your mobile device connected, SnapPea will automatically install the app on your phone.
SnapPea: Android’s Best Friend for Your Desktop [Beta Release]

For the typical Android user, content is scattered across a bunch of different places. Google Play for your apps; iTunes for your music; maybe DropBox or Google+ for your photos; and text messages are stuck on your phone.
- SnapPea is the solution for users who want all of their stuff in one place. It gives you instant access to your apps, music, pics, and texts from your Windows desktop. Transfer files, share pics, or text message from the comfort of your computer.
- SnapPea also sideloads free apps to your Android with just one click. It’s a lifesaver for users with a slow or expensive mobile data plan. Downloads come from 1Mobile, Google Play, iTunes Trailers, and TED Talks, with more on the way.
- SnapPea for Windows is a free download It supports instant WiFi or USB connection to over 1000 different Android phones and tablets. And SnapPea remembers your device, so you can connect over WiFi anytime without re-entering a passcode.
SnapPea is now in public beta for Android users worldwide.
- Intro video: www.youtube.com/watch?v=ja89AwYlmgk&feature=plcp
ABOUT WANDOU LABSOur team is based in Beijing with 80 employees and 4 cats. Wandoujia, our Chinese version, has been installed over 50 million times. SnapPea, our international version, just launched in beta. We’re backed by the bright folks at the startup incubator Innovation Works.
SnapPea: An Easy Way to Manage Android From Your Desktop

SnapPea is a new way to manage everything Android from your Windows PC. SnapPea makes it dead simple to organize your phone’s contacts, music, pics, and video from the comfort of your desktop.
“Managing content directly on your phone is like a visit to the convenience store: fast, but with limited options. SnapPea for Windows is like a supermarket: visit us when you want to transfer files, browse a photo album, or manage the music library stored on your Android,” says company co-founder Junyu Wang.
SnapPea for Windows (beta) is now available as a free download at www.SnapPea.com It supports over 1000 different Android phones and tablets, so that you can instantly connect to almost any device via USB or WiFi.
SnapPea also offers 100% free app downloads from our content partner 1Mobile and sideloading of APK app files. This can be a lifesaver for users with a slow or expensive mobile data plan.
SnapPea is designed for Android users who’re tired of searching for their phone’s content scattered across various mobile apps and the web. Google Play, handset manufacturers, and cloud services all address pieces of the puzzle, but SnapPea brings it altogether in one program.
SnapPea’s the missing companion to manage everything Android from your desktop.
Get started now! www.SnapPea.com
ABOUT WANDOU LABS
Our team (Wandou Labs) is based in Beijing with 70 employees and 2 cats. Wandoujia, our Chinese version, has already been installed over 45 million times. We’ve been hard at work for the past four months to bring you SnapPea, our international version. Wandou Labs is backed by the Chinese startup incubator Innovation Works.

3 GEEKY EXTRAS:
- For Android geeks, SnapPea’s a convenient way to sideload APK files.
- We’ve spent thousands of hours troubleshooting the Android Debug Bridge (ADB), so that users can instantly connect to almost any Android device via USB.
- Desktop software is often clunky, but we’re striving to keep SnapPea simple and elegant. Design is a strong focus at our company (our co-founder Junyu Wang is a designer), which is still rare at Chinese startups.
TOP 5 FEATURES:


Another Best Free Android Google play store alternatives.
How To Format and Clean Install Windows 8
Clean Format Install WindowsHow To Format and Clean Install Windows 8

The Format and Clean Install Windows 8 means removing any existing operating system previously installed on your computer like (Windows 8 installation, Windows XP, Linux, Windows 7… it doesn’t matter) and then installing Windows 8 from scratch on that same drive. In other words, a clean install of Windows 8 is to erase whatever is there and install a new copy of Windows 8, is usually the best method of installing Windows 8.
It is very important that you Back up your files before you Format and Clean Install Windows 8, also change the first boot device so you can boot from the windows 8 disk. Now Follow the below steps.
Step1: First you got to place a Windows 8 DVD in your optical drive.
Step 2: Enter your Language and Preferences and click "Next" to continue.
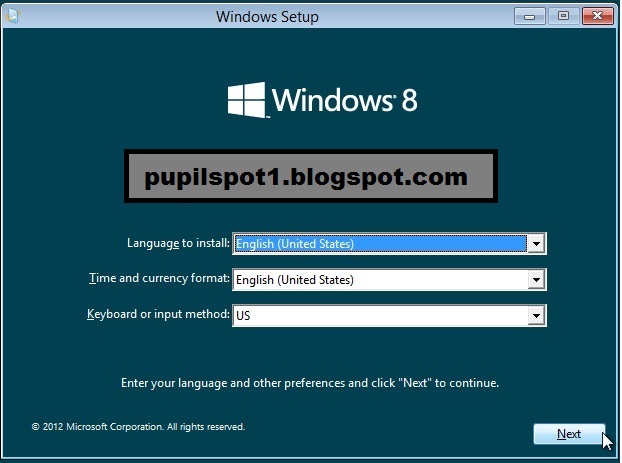
Step3: Then click on "Install Now"

Step 4: Type your Windows 8 key and click "Next"

Step 5: After this Accept the License agreement and then Click on Custom Install
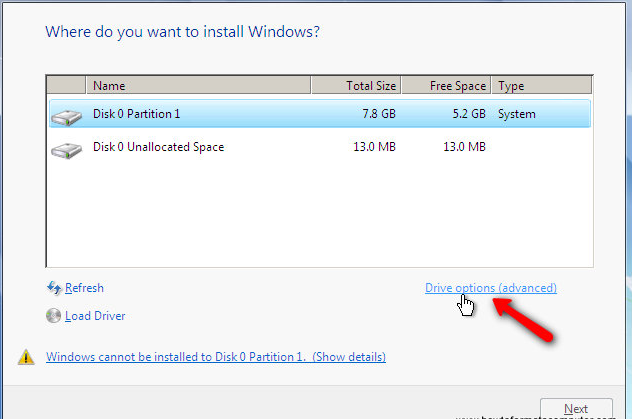
Step 6: You would probably see a recovery partition, if you do so, do not delete it, just select the drive option(advance) and then select delete. Make sure you have everything backed up before you do this.
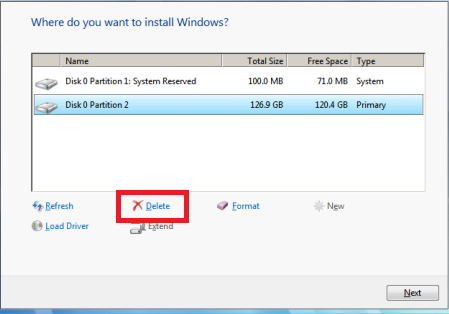
Step 7: After this select the system reserved partition and again click on delete.
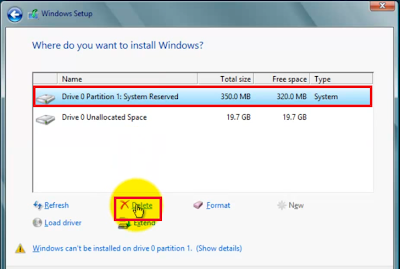
Step 8: You don't have to format the drive because Windows 8 automatically format the drive, just click next to start the Windows 8 installation process, but if you have any operating system previously installed then you should have to format the drive.
Step 9: Windows 8 starts the installation process and starts copying all the necessary files to your hard drive as shown on the image below.
Step 10: When your PC reboots it attempts to boot from DVD as its the first boot device. Do not press any key during the boot prompt so Windows 8 will continue with the installation by booting from the hard drive.
Step 11: After the reboot your computer will be prepared for first use
Step 12: After this the simple and usual procedure will come. You will do easily your next installation process.
If you have problems regarding this tutorial let me know in the comments bar. Like me on Facebook, follow me on twitter and subscribe via Email to get latest updates.
:
Step 7: After this select the system reserved partition and again click on delete.
Step 8: You don't have to format the drive because Windows 8 automatically format the drive, just click next to start the Windows 8 installation process, but if you have any operating system previously installed then you should have to format the drive.
Step 9: Windows 8 starts the installation process and starts copying all the necessary files to your hard drive as shown on the image below.
Step 10: When your PC reboots it attempts to boot from DVD as its the first boot device. Do not press any key during the boot prompt so Windows 8 will continue with the installation by booting from the hard drive.
Step 11: After the reboot your computer will be prepared for first use
Step 12: After this the simple and usual procedure will come. You will do easily your next installation process.
If you have problems regarding this tutorial let me know in the comments bar. Like me on Facebook, follow me on twitter and subscribe via Email to get latest updates.
How to Install Android Market on PC
Android Install Market How to Install Android Market on PC


If you’ve always wanted a way to download an application from the Android Market directly to your PC, then i have made this easy for you, just follow the simple steps of this tutorial and access to the Android Market on your computer very easily.
So let's start..
In order to run or install the applications directly from the Google Play Store you need to download the BlueStack Application from the link below

Download BlueStac App
When you've installed BlueStack Application then any APK formatted file on your computer will be automatically recognized bu BlueStack Application.
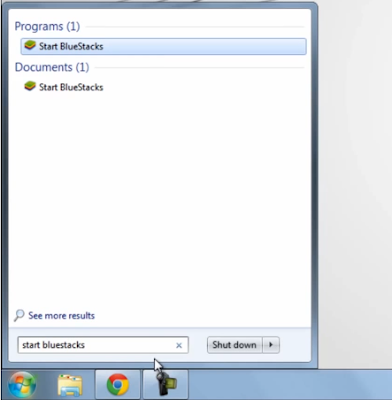
Alright, the next thing which you have to do to go to >> Start Manu and type the Start BlueStack to run the BlueStack Apllication.
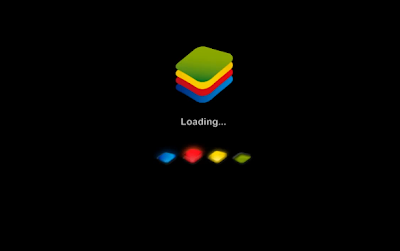
After this the BlueStack Application getting loads up as like image below
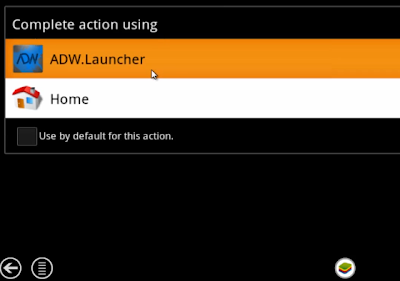
After Loading BlueStack, you have to choose the first option ADW.Launcher and then click on OK.
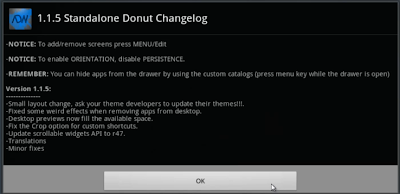
And after this, choose the Google Play Store option or icon in order to download Apps from Google Play Store.
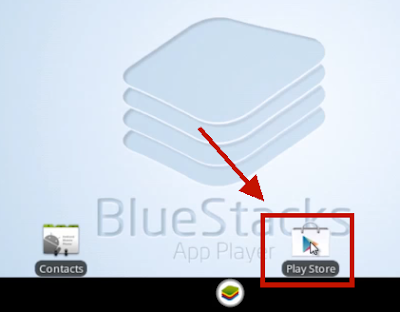
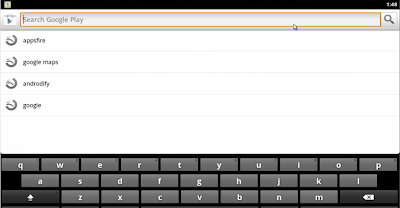
And now if you want to install any of the application, just hit on the search icon and type the application name for example Angry Birds or Dropbox on the search bar and download it.
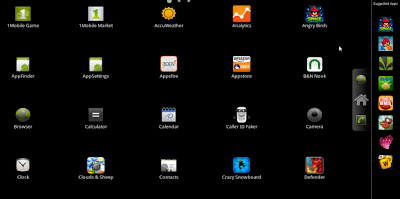
You can also install the applications from the other applications providers like Mobile Market and Amazon App store.
That's all..
How to Install Windows 8 From a USB Drive
Drive Install Windows
The most used way of installing a operative system today is from USB drives instead of optical media. The most important reason to this is, among others, the speed of installation and how easy it is to maintain your source files up to date. You can save yourself some time by installing from USB.
This article will cover the process of preparing your USB so you can install Windows 7/8 from it.The result will be a USB drive that can be used to install Windows 8, Windows 7 and Windows Vista.
Preparing the drive
Open a command-prompt window. You can do this by typing CMD in the Start Menu and pressing Enter afterwards. I use a program called PowerCmd for all my command-line needs, but you can use Windows built-in utility.Diskpart is a command-line utility already built-in into Windows that allows you do many things with your hard disk and other drives. You can delete/create partitions, format disks, assign drive letter and more.
Type diskpart and the utility will start right away. The list disk command will list all available disks in your system. In my case, the USB drive is listed as number 5.

- Select the correct drive. Type select disk X, where X is your USB drive.

- Delete all existing partitions on your drive. Type clean.

- Create a new primary partition. Type create partition primary.

- Select the new partition to work with. Type select partition 1.

- Mark the partition as active (bootable). Type active.

- Format the partition as NTFS. Type format fs=ntfs quick label=”Win8?.

- Assign a drive letter to your drive. Type assign.

- Exit Diskpart. Type exit.

That’s it. The drive is already formatted and marked as active so you can boot from it.
Copying the instalaltion files
To install Windows from you freshly prepared drive, you need to copy all the contents of the DVD disc or ISO image to your drive. Do it by selecting all files and copy them to the root of your USB drive.
Now you can go and boot from the USB drive to install Windows.
Diskpart commands list
Here are the commands we used in this tutorial. This list can help you as a quick reference.DISKPART> diskpart
DISKPART> list disk
DISKPART> select disk X
DISKPART> clean
DISKPART> create partition primary
DISKPART> select partition 1
DISKPART> active
DISKPART> format fs=ntfs quick label="Win8"
DISKPART> assign
DISKPART> exit
Thanks to Ajus for this excellent post
How To Root QMobile A10,A8 A500,A600,A950 & Install Custom Recovery
A10A8 A500A600A950 Custom Install QMobile Recovery

The origin method we are going to mention here is quite easy and after that we will guide you to install made-to-order Recovery in your telephone. This will endow to install made-to-order ROMs in your teletelephone and Enjoy most of it.
Disclaimer: The software packages provided here are not our development , so , if anything proceeds wrong we will not be held to blame.
You just need to Take care of few things while applying this method. Make certain you take following precautions.
- Make certain your phone is more than 60% or more charged.
- Make certain your phone’s drivers are absolutely established in your PC, Download it from here
- Turn On USB Debugging. From android Developers Settings.


HOW TO Root Your Qmobile?
Few things you need to download first are
- Download and establish Drivers for window before you start the process. You can use official suite of QMobile to establish drivers for your phone in your PC.
- Download Root package and extract it on desktop. recall the title of folder in which you have extracted these documents.
Method
- Connect your telephone to PC via USB twisted cord.
- Go to the folder where you have kept the extracted documents on desktop and find a file with title of “RUN.BAT”. twice click it to run it.
- A cmd window will open asking you to enter a choice. You should go in “1? and then press go in. Wait for the method to complete. After that your teletelephone will Reboot Automatically.root-qmobile-a10-a5
- Enjoy with your rooted Qmobile.
HOW TO Install custom Recovery:
- Proceed to the proceedogle playstore from your mobile. seek and establish ” MTK Mobile Uncle Tools”.
- Download Custom Recovery for your wireless and extract the downloaded documents in your PC.
- Go to the extracted documents where you will find a file entitled as “rec0very.img”. attach your to PC via USB twisted cord and move this File in SD business business business card of your telephone.
- Now proceed to App sliding shelf of your phone and Run “MTK wireless Uncle devices” and choose recovery revise option.
- Select “rec0very.img” from your SD business business card and wait for the process to complete . After that your teletelephone will have Root access with made-to-order Recovery establish. relish It ! and give us your feedback.
Inscription à :
Articles (Atom)