Affichage des articles dont le libellé est create. Afficher tous les articles

Create A Banner Free For Your Blogger / Website With MS Paint

Create A Banner Free For Your Blogger / Website


The banner of your blog or website is the first thing which is seen by the visitor at first.If your blog is having a decent banner then the visitor thinks that the website is also decent and the information over here is also reliable.So, this is very important to choose one decent banner.Many bloggers do not have efficient knowledge of Photoshop or other designing tool.So,they face difficulty to choose one banner or they just use the default background of the banner or the default WordPress or Blogger banner.
How to Create A Banner Easily:
Here i am going to explain you some short and easy way to make one decent banner for your blog or website which will almost like one professional banner and will be a creation of your own.

Step 1:
At first open your “mspaint” to open this window just click on “Windows button+R” .Then the Ms paint will get opened.Define your size of the window as per your banner size that you want to create.The picture will be like below:


Step 2:
Now pick any color from the color option as you like and that matches your blog background.Then after clicking on the color, click on the color bucket and then click on the white space of the mspaint.The picture is like below:


Step 3:
After filling the color your banner background will be like below:


Step 4:
Now Click on the “insert Text” option and write your “Website name” with the front that you want to use for your banner.You will also be able to change the size of your banner text.If you have any tag line for your blog then put this also just below the blog title.The sample will be like below:


Step 5:
Now from the above figure you can see that your blog banner is almost done.If you like it then save it and upload as the header image of your blog or website in WordPress or Blogger blog.
The above procedure is just to help new bloggers with a decent blog banner so that they do not need to use the boring default banner of Blogger or WordPress.
If the above tips help you then please share this among your friends or blog community.

How To Create Full Width Post For Specific Post / Page In Blogger

How To Create Full Width Post For Specific Post / Page In Blogger No Sidebar View

Hi Bloggiyan Today I am gonna share simple trick to Full page widget post in blogger & Remove Side bar. 
Do you think in blogger platform you can neither hide a Sidebar nor can create a full width page? Blogger is not a flexible platform though, with the help of XML and CSS we can remove the sidebar and can even increase the width without facing difficulties whatsoever. 

Following screen will show you before adding this script 


Following screen will showing after adding full width page post script 


Easy Step To Create a Full Width Page & Remove Sidebar in Blogger

Go to Blogger.com >> Add NEW Page/Post
Now select HTML TAB on Blogger Post Editor
Paste the following CSS and XML Code:

See Screenshot for better understanding ..


Save / Update Post / Page Done....
IF You Like This 60 Sec Trick Do Comments ...

How To Create Mobile Template For Blogger

 How To Create Mobile Template For Blogger 


By 2013, more people will use mobile phones than PCs to get online.Do you secure your blog future by making your blog mobile friendly.By making your blog mobile friendly it can drive lot of traffic to your blog.Blogger is providing only 7 template which you can't customize.In this post I will help you make your desktop website more mobile-friendly by creating fast loading mobile blogger templates.Just follow below steps to create mobile template for blogger.

Step 1

Go to http://www.howtogomo.com now scroll down and you will find picture says "Create Your Mobile Site Now" Just click on it.

create your mobile site

Step 2


Now you have to enter your blog URL,after entering your blog URL just click on "Make My Site Mobile" Button.

Enter Your URL

Note-By clicking "Make My Site Mobile," you are sending information to DudaMobile. See related Privacy Policy.

Step 3


Now a pop out will appear asking you for selecting template type,I will prefer you to select Blog Template because it will provide you wide range of responsive templates.Now you need to chose blog template for your site there are total 13 template available for your blog select one of them and remember to test is before applying.

themes

Step 4

Now after selecting proper template for your blog click on Next Button to proceed ahead.Now you will find many option to customize your mobile template according to you.
customize

  • Edit Header & Logo:After clicking on this option it will provide you tool by which you can change blogger background color you can also add image or text to header.You can also add Css to customize header.
  • Blog Homepage:It will provide you tool by which you can change background color of homepage body.You can also change text font and size.
  • Blog Posts:By clicking on it you can view the main post area of your blog.
  • Blog Comments: If you don’t have an interactive commenting system your visitors will never leave a comment so this tool will allow you to customize your comment style. You can change color, add avatar and much more.
  • Footer: As we all know Footer is the place where we give credits to the developer of the website so you can use it for that purpose. However, you can also use it to increase your width and height and much more.

Step 5


Now after customizing you template you need to register free account and remember it will not take lot of time because you just need to enter your email and password.

Save My Site

Step 6

Now you can see link just click on it and preview your mobile blog from different mobile OS.We need to setup your blog redirection for this you will see blue button with text "SETUP MY MOBILE WEBSITE REDIRECT".
button
After clicking on above button you will see JavaScript code in text box just copy that code and paste it above tag in your blog.
java

huh! Finally we completed all the steps now jus rush to your mobile devise and preview your mobile friendly blog there

What Is A Blog and How To Create A Blog?

Background:


A blog or web log is a personal web site made up of usually short, frequently updated posts that are arranged chronologically. The content and purposes of blogs varies greatly from links and commentary about other web sites to observations about news or politics, diaries, photos, poetry, essays, project updates, even fiction. Blogs are a fast growing segment of the web. An article in the August 26, 2002 Newsweek estimated the number of blogs at 500,000 with a new one coming online every forty seconds.

Assumptions:


We will make the following assumptions about users who plan to follow these instructions:
  • You have a personal computer with a connection to the Internet.
  • You have a personal email account.
  • You have a moderate amount of experience using the World Wide Web.


It is not necessary to know html to maintain a blog, but it is helpful if you want to customize it.

We will use the free web-based publishing Blogger and the free blog hosting service Blogspot.

Instructions:


1.)Go to the web site www.blogger.com. On the right hand side of the page, about half way down you will see a blue box that says, “Sign Up,” (see Figure 1). In the corresponding blanks, enter a username and password for yourself. Confirm your password.

NOTE: Remember your username and password. Write them down if necessary.

2.) In the next screen enter your first and last name and your email address. Then click the link to read the Terms of Service, and click the checkbox indicating that you have. After entering this information, you will return to the Blogger.com home page as a logged in user.

3.) On the right hand side of the home page you will see a blue box that says, “Your Blogs,” (See Figure 2). To start your blog, click where it says “Create a new blog” in the blue box. After your blog has been created, you will return here to update it.

4.) You are now at a screen that prompts you to enter a title and brief description of your blog, (See Figure 3). Also it will ask you if you want this to be a public blog. Enter your title, enter your description, choose public or not, click next. A “public blog” will be listed in the Blogger directory and might appear on the recently updated list on the blogger.com home page. If you choose no, your “Private Blog” will still be viewable to anyone on the internet.

5.) You are now given the option of hosting your blog at Blogspot or using Blogger to update a website hosted elsewhere, (See Figure 4). Make sure that “Host it at Blogspot.” Is selected and click next.

6.) Now you will choose an address for your blog and agree to the Blogspot terms of service, (See Figure 5). It would be a good idea to use the same address as the title you chose in step (4.)

NOTE: The address for your blog will follow the form:
http://whateveryouchoose.blogspot.com/
Remember this address. Write it down if necessary.The address for this set of instructions is you would like to use in the appropriate blank, next to “I accept the Blogspot terms of service” and This screen offers you a selection of eight templates for your blog. (). The template determines what your website will look like. Select one of these eight right now, but you can change at any time to one of the many other templates available or even create a custom one of your own. Now you are at the Blogger interface that you will use to update your blog from now on. On this first visit, the following instructions will appear on the bottom half of the screen. I have copied and pasted them here for future reference.


http://bloginstructions.blogspot.com/Enter the addressclick the checkboxclick next.

7.)See Figure 6Select one of the templates and click “Finished.”

8.)
Quick-Start Instructions
Posting: Enter text and/or HTML in the form field above and hit the post button in the upper right. All posts will show up here.

Saving to your server: To transfer the latest version of your blog to your web site, hit the "publish" button on the right of the black bar, above, or the "post & publish" button in the toolbar at the top. (If there are no changes since your last save, the "publish" button will not appear.)

Editing: All posts that you have permission to edit (which is all posts created by you, or, if you're an administrator of a collaborative blog, all posts) will appear with an [edit] link. To get to older posts that are not showing up in this frame, use the filter form on the right. This filter will not effect what appears on your actual blog page.


NOTE: Your blog will not be published and therefore not viewable for the public until you have published some text or html code.

How To Create Google Custom Search Engine ?

How To Create Google Custom Search Engine ?

 Google-Custom-Search-EngineWhen it comes to crawling the internet or a website nothing can surely beat Google's searching technique. Blogger Templates that are found in various designs and colours often have custom search boxes in it, which I am sure you might have observed are incapable of displaying the relevant results. These search boxes by default are limited to their ability of searching each and every word of your blog. The best solution is to use Google Custom Search Engines (CSE) that are extremely efficient in digging out the most important data from your blog and displays it to the visitor. This increases the number of pageviews and page impressions of your blog because the reader is kept engaged in reading more and more. Further you can easily integrate your Google AdSense Ads to your Google Custom Search box, which again increases your blog revenue for every click made on the search results. An Example of such search engine can be found below every post of this (MBT) blog. So lets create and install a beautiful Google Search box for your blog.


How To Create a Custom Google Search Engine?

  1. Go To Google CSE
  2. Hit the create custom search engine button
  3. Fill the form as shown in the screenshot below,
set up your google search engine
   4.   The Click the next button and choose the Design for your search engine. You can click the "Customize" button to edit the colours and look.
customize-the-look-and-color
   5.  Hit the next button and then click the "Look and feel" link on the next page as shown below,
CSE-look-and-feel
It will bring you a page where you will find three layout options i.e Full -width, Compact and Two Column as shown below,
Google Search Engine Layouts
  • If you wish to add the search box just below posts as I have done on my blog then choose Full-width
  • Or if you wish to display the box and results on the sidebar then choose compact
  • Else if you wish to add your search box to your sidebar and display the search results above the post title then choose Two Column
  6.  Finally hit "save & get code" button and jump to the next part of our tutorial.

Add Google Custom Search Engine To Blog Posts

To add the search engine just below your blog posts as we have done on MBT then please follow the steps below,
customize Google Custome Search Engine
  1. Go To Blogger > Design > Edit HTML
  2. Backup your template
  3. Click the Expand Widgets Templates Box
  4. Search for
  5. Just below it paste your Blog Post Search Engine Code (Full-width)
  6. Save and you are done!
  7. View your blog to see it appearing just below posts.

Add Google Custom Search Engine To Blog Sidebar

  1. Go To Blogger > Design
  2. Choose a HTML/ JavaScript Widget
  3. Paste your Sidebar Search Engine Code (Compact or Two Column) in it
  4. Save and you are done!
  5. View your blog to see it working just fine
Changing your default search box to Google Custom Search Engine Box is an important step that you must take as early as possible. You will see the difference in your analytics the next week. In the next post as shared below you will learn to integrate your AdSense Ads to your Custom Search engine and increase your Adsense earnings.


How do I create a Blogger Feed?

How do I create a Blogger Feed?

  1. Enter your blog's web address in the "Ready to Burn?" form found on FeedBurner's homepage and at the bottom of the pages in the Blog and Podcast sections. If you plan to publish a podcast with your Blogger feed, check the "I am a podcaster" box. Click Next ».
    The Identify Feed Source page should appear.
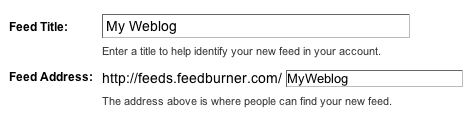
  2. On "Welcome", make sure the title and FeedBurner address (URL) of your new feed are values you prefer.

    The Create or Sign In To Your FeedBurner Account page should appear.
  3. Also on this page, create a FeedBurner account by picking a username and password and supplying your email address.
    When you've supplied all the required information on this page, click Activate Feed ». A "Congrats" page should appear.
  4. Read all of the information on "Congrats", then click Next » to continue with the setup process.
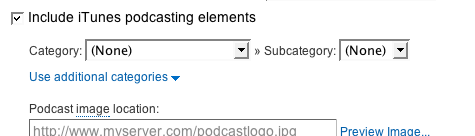
  5. If you selected "I am a podcaster" on the homepage, configuration options for our SmartCast service will appear. Here you can supply categories and other information for iTunes, append a copyright message, and submit your podcast to Yahoo! Search.

    When you are finished, click Next ». Configuration options for FeedBurner stats services should appear.
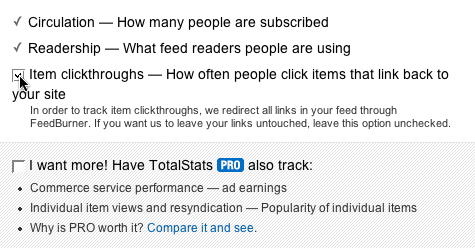
  6. On the stats configuration page, select the level of feed stats detail you want.

    Click Next » to finish the setup process and enter our feed management interface.
    You're now ready to make your FeedBurner feed available on your Blogger site!

Tracking 100% of your feed traffic: Redirecting your Blogger feed to your FeedBurner feed

Blogger can make sure all feed traffic for your blog content goes to your FeedBurner feed. This ensures your FeedBurner stats are comprehensive and accurate; even subscribers to the 'Original Feed' are routed through FeedBurner. To redirect your feed:
  1. In a new browser window, sign in to your Blogger account.
  2. From the Blogger Dashboard, click the Settings link for the blog you want to promote.
    The Settings page for your selected blog should appear.
  3. Click the Site Feed link under the Settings tab.
  4. Type your complete FeedBurner feed address into the Post Feed Redirect URL text field. Make sure you type in your entire feed address including the "http://" portion.
  5. Click Save Settings.
    You should see the message "Settings were Saved Successfully".
  6. Blogger will now redirect all feed traffic for your blog to your FeedBurner feed.
    Note: If you are using the redirection feature within Blogger to send all of your feed traffic to your FeedBurner feed, you may want to modify the code we provide in order to keep your subscribers with you, even if you leave FeedBurner.