Affichage des articles dont le libellé est Header. Afficher tous les articles

How to Upload a Customized Header on Blogger Blog?

How to Upload a Customized Header on Blogger Blog?

Those who are having blog in blogger, the free platform from Google, knows that the header option is not that flexible and you are not that independent to customize it and create a good header. So, what many people do to make it more attractive is upload a customized header image. This gives an extra appeal to the blog and your blogs becomes an exceptional one from other blog.
To create such kind of header you must need to do two steps. One is to make one customized header and other is to upload it in the header. You can create the header many ways. But in my blog i have already instructed how to make one banner or header using MSpaint. You can check that post.
After creating the the header now you need to upload it in the header portion. To upload it in the header portion you can follow the below steps:
1. At first go to your blogger dashboard and then click on “Layout”.
2. Now you need to click on the “Edit” option of the header part. The image will be like below:


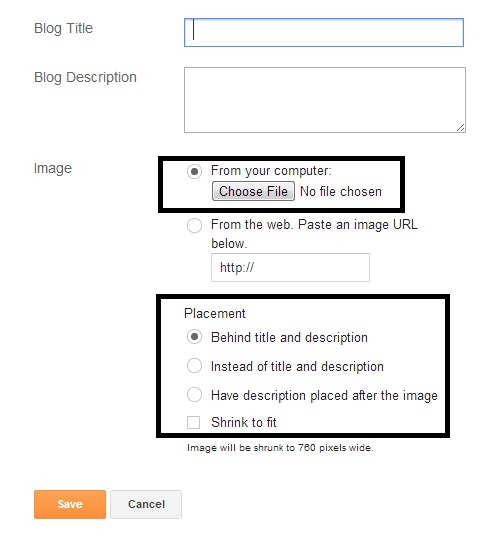
3. Now you need to upload the banner image from your computer that you have created. The screen will be like below:


4. After choosing the image it will get uploaded automatically. You will also get some option which will define in which way the picture will get uploaded. Whether it will get uploaded over the blog name or you want to keep the blog name text and also the image.
You can choose it according to your need and now you need to “save” the setting and you are done.

If you face any problem, you can ask me through comments.

Add Your Adsense Code In Blog Header And Footer To Increase Your Income


Add Your Adsense Code In Blog Header And Footer To Increase Your Income
If your want increase your earning Via Adsense on Blogger Your are at right place 

Hello Bloggiyan Today We are going to show easiest way to increase your income with this simple trick . If You want to To insert Adsense Ads below header, in sidebar and at the end of the blog is very simple by adding Adsense in the gadget section but if we place Adsense ads inside blog post i.e. below post title and at the end of the post it can really help to get readers eye on ad and improves chances of click on ad and double your adsense earning
We our sharing this after applying of our blog. You can see header ads on our posts. 

Before Applying: You must have an active any Adsense account.

Easy Step To Add Your Adsense In Blogger Post 

  1. Login to your Blogger Account.
  2. Open your Blog you want to add ads to > Go to Template > Click Edit Html.
  3. Now find  and expand it if not expended. Now below this find  and expand it too.
  4. Below this find  with option to expand. Click it to expand.
  5. Before using your Adsense code on blogger you need to encode it. You can use Our HTML To XML Parser Tool For Blogger Adsense Converter to encode Adsense Code.
  6. To put Adsense ad just below your post title find 
     and paste your encoded Adsense code just above this.
  7. your Adsense code

  8. To put Adsense ads at the end of your post content find  and past your encoded Adsense code below this.
your Adsense code

8. Now Save Template and refresh your blogger post to see ads appear after post title and at the end of all posts of your blog.
This way you can add any adsense network code like Google Adsense, Chitika, Infolink, Adbrite, Adsforindian etc inside your blog posts.
How To Insert Adsense code In Blogger Post Watch This Video 

Do Comments After placing Ads in Post Header or Footer on your Blog. wish You Happy Earning.


Add Your Adsense Code In Blog Header And Footer To Increase Your Income
Last Reviewed by S2Free User on June 11 2013
Rating: 4.5