Affichage des articles dont le libellé est upload. Afficher tous les articles

How to Upload a Customized Header on Blogger Blog?

How to Upload a Customized Header on Blogger Blog?

Those who are having blog in blogger, the free platform from Google, knows that the header option is not that flexible and you are not that independent to customize it and create a good header. So, what many people do to make it more attractive is upload a customized header image. This gives an extra appeal to the blog and your blogs becomes an exceptional one from other blog.
To create such kind of header you must need to do two steps. One is to make one customized header and other is to upload it in the header. You can create the header many ways. But in my blog i have already instructed how to make one banner or header using MSpaint. You can check that post.
After creating the the header now you need to upload it in the header portion. To upload it in the header portion you can follow the below steps:
1. At first go to your blogger dashboard and then click on “Layout”.
2. Now you need to click on the “Edit” option of the header part. The image will be like below:


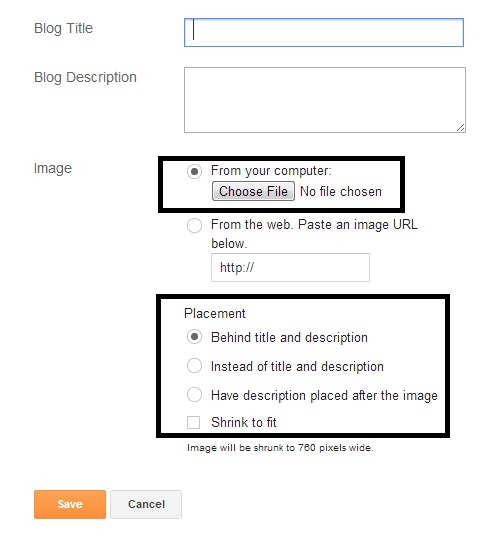
3. Now you need to upload the banner image from your computer that you have created. The screen will be like below:


4. After choosing the image it will get uploaded automatically. You will also get some option which will define in which way the picture will get uploaded. Whether it will get uploaded over the blog name or you want to keep the blog name text and also the image.
You can choose it according to your need and now you need to “save” the setting and you are done.

If you face any problem, you can ask me through comments.

Free Box Sync For Windows Upload & Share

Free Box Sync for Windows Upload & Share File Upto 5 GB  

  Upload & Sharing Files With Others No Ads No Redirect  

Description

Box Sync keeps files in sync between your desktop and Box account to help accelerate your workflow and centralize content.

- Select what you sync: Choose which folders you sync to gain easy access to the content you work with most
- Sophisticated conflict management: If two people make edits to a synced file at the same time, Box Sync can detect multiple changes and save copies of a file so your team can review potential version conflicts.
- Access files offline: You can always access the files you need right from your desktop, even when you're not online. Once you are, everything will get uploaded to Box automatically.

Box Sync is compatible with Windows 8 (non-touch devices only in Desktop mode), 7, Vista and XP, with support for 32 and 64-bit editions.

 Get a Hard Drive in the Cloud: Online Storage

 Get 5 GB Free and Organize All Your Files Into Folders 
Store all kinds of files online, then arrange them into folders just like on your desktop.

View and Access Files on Demand 
 Box provides anytime, anywhere access to your files from any device – whether you're in Nebraska or Norway.
Convenience and Peace of Mind 
Throwing thumb drives in your bag, transferring files to CDs, stressing about a stolen laptop – that's yesterday. Today, everything's on Box. 

Screen Shot


Direct Download Link


How to upload javascript .js files on Google Code Project - Upload Your Own JS File For Blogger

How to upload javascript .js files on Google Code Project - Upload Your Own JS File For Blogger 


How to upload javascript (.js) files on Google server via Google Code: Tutorial 
Hello Guys as I have already wrote a post on best alternative to google pages as they are not accepting any further applications. Which actually comes out to be Google code as it is still open to let you upload your files each of maximum 100mb including javascript, xml, rar, zip, icon files and many more. They are providing 2gb of total space for uploading your files. So you can


definitely make some good use of space on google servers. Here is how to do it...


How to upload javascript (.js) files on Google server via Google Code: Full Tutorial


Step 1. Just go to code.google.com, and login using your gmail account id.

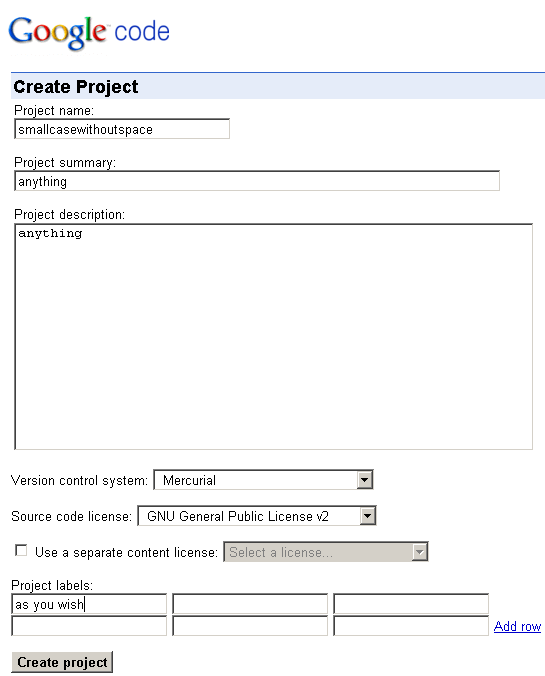
Step 2. Now go to the Project Hosting section on Google Code website and click Create a new project link, a page as shown below will open up.

How to upload javascript (.js) files on Google server via Google Code: Tutorial

Step 3. Just write the name of the project without space in small case letters, and the rest as shown in the screenshot above. Write anything in the project summary and description section, provide any labels to it and click Create Project button .

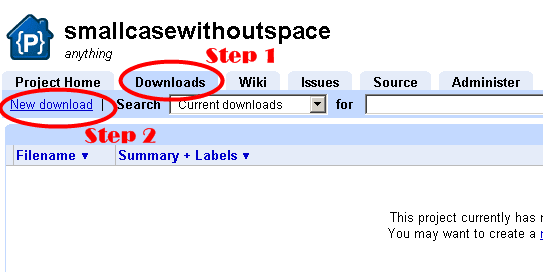
Step 4. Now once the project page is created, it will automatically open up. Now click theDownloads tab and then click the New Download link, as shown in the screenshot below.

How to upload javascript (.js) files on Google server via Google Code: Tutorial

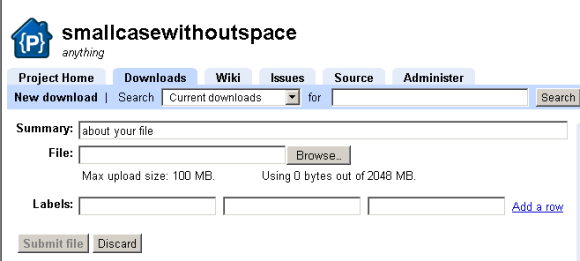
Step 5. Now a page will open for your file to get uploaded, as shown in the screenshot below.

How to upload javascript (.js) files on Google server via Google Code: Tutorial

Just write any summary about the file you are uploading, then browse the file you want to upload(max. size 200 MB), apply some label and click submit file. Now once your file gets uploaded, just copy the link of the uploaded file. Send it to anybody or put it on your blog. Hope this will help those in need for such a tutorial.